


Ecoglo photoluminescent safety way guidance systems are silent lifeguards in buildings that guide occupants to safety through the ingenious use of path marking signs, exit signage, step edge awareness, and handrail guidance. These markings create an illuminated escape route in low visibility conditions by outlining paths, noting any changes in direction or elevation, and highlighting obstacles.
When the lights go out, these markings come to life to shepherd all toward the exits. These safety way guidance systems comply with strict safety standards to ensure maximum visibility and clarity. The radiant markers lay dormant during regular use but spring into action in case of emergencies, making them the unseen saviors that guide your way in the dark.
Ecoglo photoluminescent products used in path marking systems are in accordance with the following Standards: UL 1994 Luminous Egress Path Marking Systems and CAN/ULC-S572 Photoluminescent and Self-Luminous Exit Signs and Path Marking Systems. Ecoglo path marking products should be installed as per the directions in this guide.
1. Surface Preparation
Thoroughly clean the surface with industrial strength cleaner if necessary.
Remove any loose paint or sealant, then allow the surface to dry.
2. Positioning of Signs
Mark the position on the door or wall where the sign is to be placed.
Note: Floor Identification signs – the mounting height must be in accordance with local and national codes.
3. Placement of Signs
Peel the protective layer from the back of the sign to expose the adhesive, ensuring nothing comes into contact with it.
Line the sign up with the markings you made.
Apply pressure evenly over the sign to fix it fast to the surface.
4. Maintenance of Signs
Regular dusting with a soft cloth or brush is recommended to keep the sign clean.
If the sign is noticeably dirty, clean it with a sponge or cloth.
1. Preparation of the surface
Thoroughly clean the surface with industrial strength cleaner if necessary.
Remove any loose paint or sealant and then allow the surface to dry.
If painted or coated, check that adhesive is compatible with the paint or seal coating.
2. Alignment of the Strips
Mark 50mm from the left edge of the top step.
Mark 50mm from the left edge of the bottom step.
Place a string line between the marks to ensure the strip on each step will be correctly aligned.
3. Preparation of the Strip
Clean the back of the contrast strip with a soft cloth, and if necessary, use methylated spirits (or similar solvent) to remove oil or grease
Allow to dry for approximately 1 minute.\
4. Applying the Adhesive
Apply a 3mm zigzag bead of polyurethane adhesive (such as Wurth KD Bond and Seal or Bostik Seal n Flex FC) to the back of the strip, 3mm in from the edges.
Continue along the length of the strip.
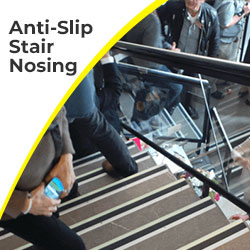
1. Placement of the Strip
Line up the strip with your alignment marks and position approximately 2-3mm back from the front straight edge of the step.
Place in position with the photoluminescent (light green) component of the strip to the leading edge of the step (see image below).
2. Apply Pressure to the Strip
Apply even pressure to spread the adhesive beneath the strip using a hand roller.
If necessary, stand on each strip to ensure good contact between the strip and the step.
3. Allow the Adhesive to Cure
Immediately following installation, close off the area for a period of 8 hours to avoid the Ecoglo strip being moved whilst the adhesive is in the early stages of “cure.”
Wait until the adhesive has fully cured (allow at least 24 hours) before trimming any excess from each strip with a sharp blade.
4. Use of Fixers
For outdoor timber installations, both adhesive and fixers should be used because installation onto outdoor timber surfaces varies due to the uneven nature of timber, the various types of timber (e.g. pine or kwila), the protective coating (e.g. paint or sealer) and seasonal temperature variances.
Step 1:
Apply adhesive as per steps 3-4, taking care to keep adhesive away from pre-drilled holes.
Place strip as per steps 5-6.
Leave the adhesive to cure for 7 days before installing the fixers.
Step 2:
Place a screw fixer into each hole and drill in securely using a battery drill.
Do not fully tighten the fixers to avoid compressing the adhesive.
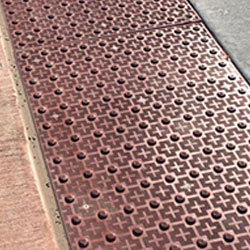
For timber installations, the strips should be pre-drilled through the anti-slip material. The table below shows the number of drill holes required to allow for the natural contraction and expansion of timber.
1. Maintenance of Strips
Regular vacuuming or brushing with a stiff bristle head brush is recommended to keep strips clean.
If strips are noticeably dirty, clean them with a sponge or cloth.
Ecoglo guidance strips are tremendously versatile and can be applied on various types of surfaces, including walls, skirting boards, floors, door frames, flat-sided handrails, and steps*. Generally, as long as the substrate is clean, flat, and dry, the product can be successfully installed.
1. Preparation of Surface
Thoroughly clean the surface with an industrial-strength cleaner if necessary.
Remove any loose paint or sealant, and then allow the surface to dry.
If the surface has been painted or coated, check that adhesive is compatible with the paint or seal coating. IF IN DOUBT, REMOVE THE COATING.
The tape is suitable for a temperature range of 0-40C.
Maximum installation length is 1500mm.
2. Positioning, Alignment of the Strips
If installing on a flat handrail or other surface, such as a wall, mark the position where the strip is to be placed. Use a chalk line, plumb line, or spirit level if necessary to ensure the line is straight.
If installing on steps, mark 50mm from the left edge of the top step and 50mm from the left edge of the bottom step. Place a string line between the marks to ensure the strip on each step will be correctly aligned. This will give a straight, true line.
Offer up the strip to the surface it is to be attached to make sure both surfaces are parallel. If the strip does not sit perfectly flat against the surface without being held in place, carefully bend the strip until it sits perfectly flat against the surface.
3. Placement of Adhesive-backed Strip
Carefully peel off the release-tape backing from the strip.
Carefully line the strip up with any alignment marks.
Press the strip firmly in place to ensure even contact between the adhesive tape and the surface to which it is being applied.
4. Mechanical Fixers (Screws and Rivets)
For handrails in schools or other places where vandalism may occur, screws (for timber, as described above) or rivets (for metal) MUST be used. Install one screw/rivet 10-15mm in from each end of each strip.
For outdoor timber installations, screws MUST also be used so that the adhesive tape isn’t able to lift if the timber distorts or absorbs moisture due to normal weather conditions. 5mm pan head screws are suitable to be screwed down firmly but not so tight that the tape squashes under the strip. Install one screw 10-15mm in from each end and one screw in the middle of each strip.
If in doubt about the adhesion of the strips to any substrate, use screws/rivets for additional security. Install one 10-15mm in from each end and one in the middle of each strip.
5. Maintenance of Strips
Regular vacuuming or brushing with a stiff bristle head brush is recommended to keep the strips clean.
If strips are noticeably dirty, clean them with a sponge or cloth.
Regular cleaning to remove built-up dirt and objects on the strips will ensure Ecoglo will continue performing to expectation. Note that the photoluminescence will continue performing even after UV exposure or exposure to moisture. The only reason for the degradation in the performance of the photoluminescence is a lack of correct cleaning.
1. Vacuuming or brushing with a stiff bristle head (wet or dry) is often enough to keep the strips clean. The glowing strip can also be wiped clean with a wet or dry sponge or cloth. Observation will determine if cleaning is required; however, a regular cleaning every 4 to 6 weeks or after particularly heavy use should ensure correct performance.
2. High-pressure water (but not steam cleaning) can also be used to clean the strips.
3. Do not use highly alkaline or acidic cleaning agents. The pH of the cleaning agents should be between pH 5 and pH 12. If cleaning agents are applied at more than pH 10, the strips should be rinsed with pH neutral (pH 6 to pH 8) solution afterward.
Providing a safe environment for people in your building is not just a requirement; it is your responsibility. Ecoglo's breakthrough photoluminescent "Safety Way Guidance Systems" are the smart, stylish, and sustainable solution to meet safety compliance needs.
These innovative systems expertly guide people to safety in emergencies and power outages. The Path marking signs, exit signage, step edge awareness, and/or handrail guidance glow in the dark for hours, clearly marking exit routes and stairs even when the lights are out.
Don't risk non-compliance fees or harm to your occupants. Tactile Solutions Canada with Ecoglo delivers an affordable life safety and guidance solution. We make it easy to do the right thing - contact us today to experience the difference in your building. When emergencies strike, Ecoglo glows. Your path to safety starts here.

